Otter DTF Technical Support
Preparatory work
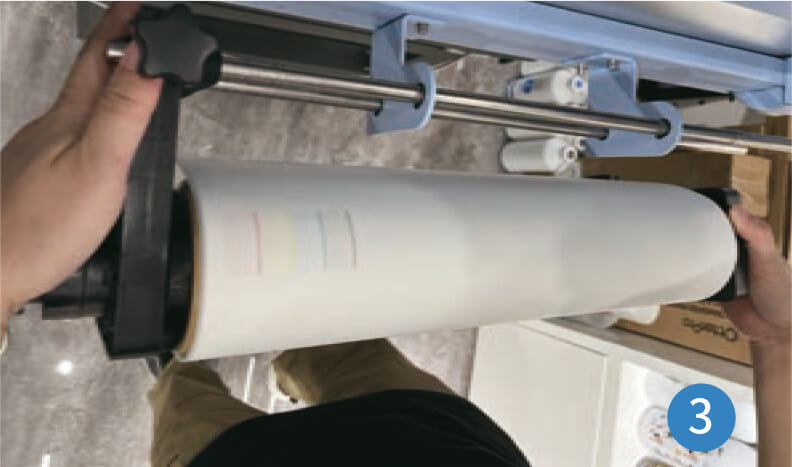
1. How to install the film roll correctly?
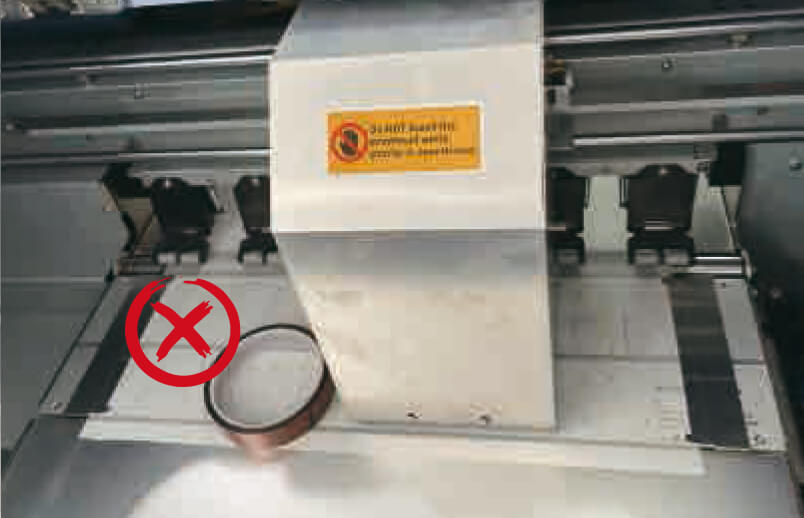
For beginners, it is important to learn and pay attention to a few tips when installing film on a DTF printer. Incorrect installation can lead to damage to the print head.

First make sure that the printable side of the film is facing outwards.
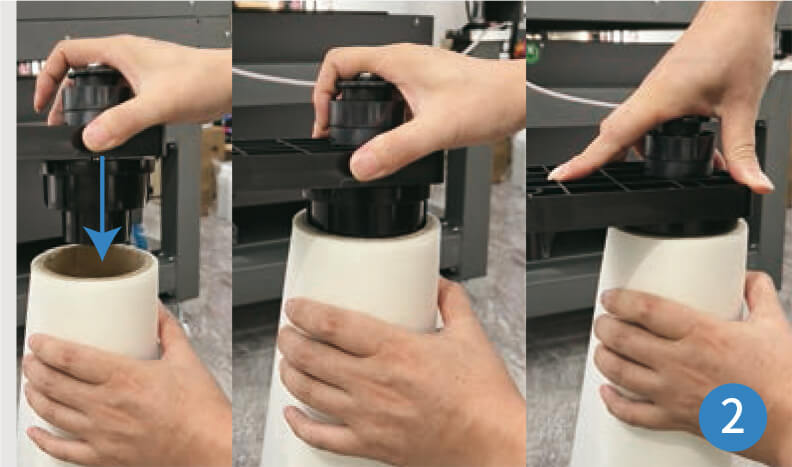
Place the rod in the core of the film roll.
Adjust the tension with the smooth feed cushioning mechanism.
Ensure that the pressure roller is set to press on both sides of the film, then lower it into position.
Finally, use the guides to position both sides correctly.
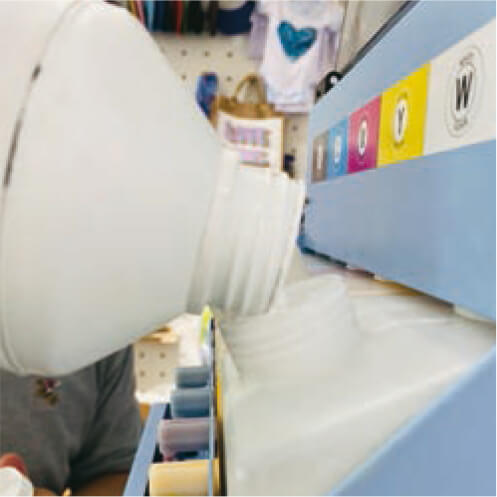
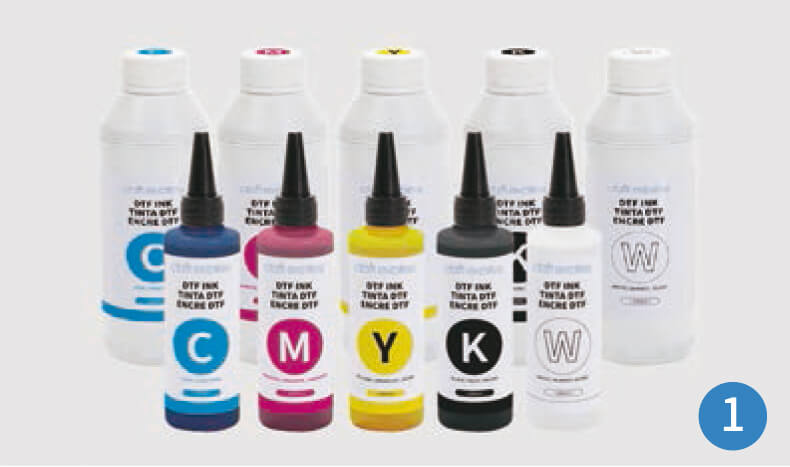
2. When should ink be refilled and how should it be done?
If the ink level is low, the blue light above the corresponding ink tank flashes and beeps. In this case, top up the ink.
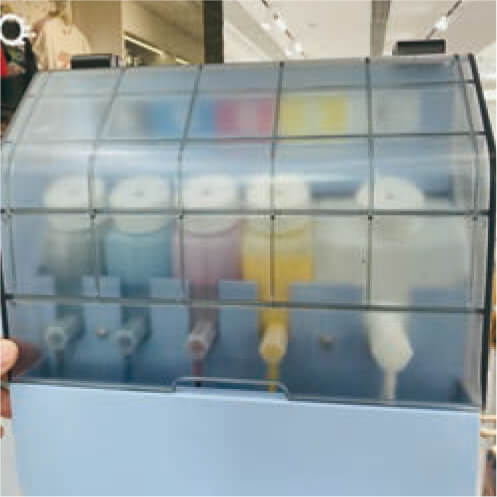
Note which ink tank is low and refill with the appropriate colour.
Note which ink tank is low and refill with the appropriate colour.
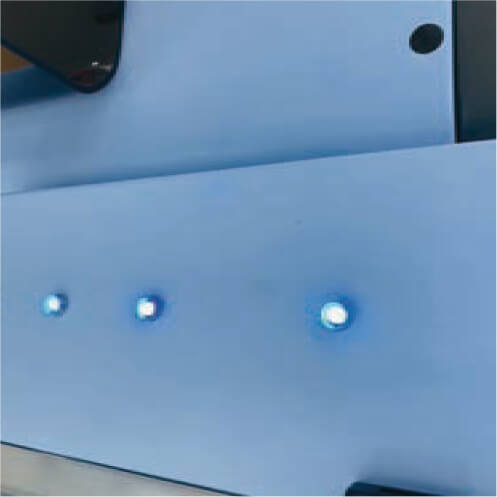
There is no need to switch off the printer when adding ink. Even while printing, ink can be added without affecting print quality.
3. What to do after replacing the printhead?
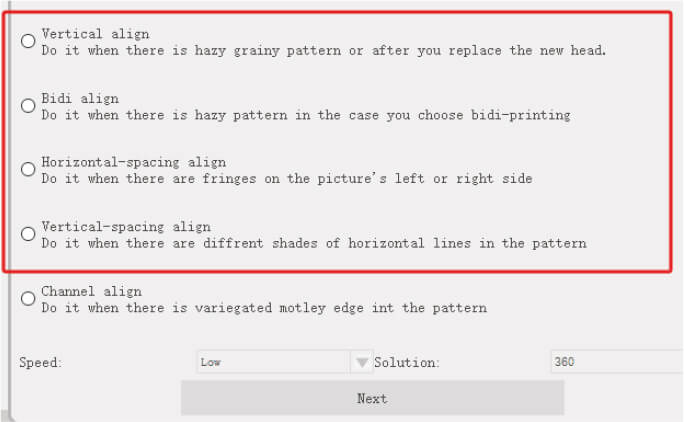
Replacing the printhead on your DTF printer is a critical task, so be sure to read the manual for precise instructions. After replacement, the printhead should be calibrated to ensure smooth and successful print operations.
If the lines are still not aligned, repeat this step until they are aligned.
Align the position of the white nozzle in the same way.
Otter DTF printer maintenance
Regular maintenance is crucial for DTF printers to maintain optimum performance. This practice not only extends the life of the printer and heads, but also guarantees the quality of the prints and finished products.
Daily maintenance
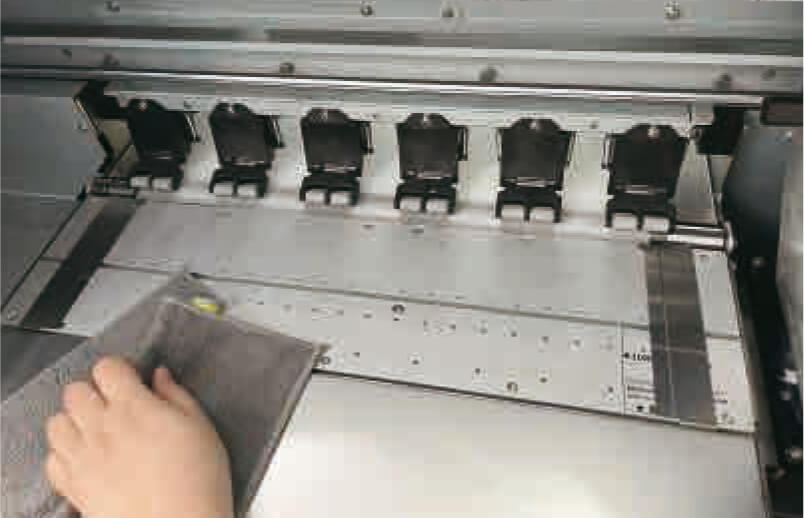
Printhead nozzle maintenance
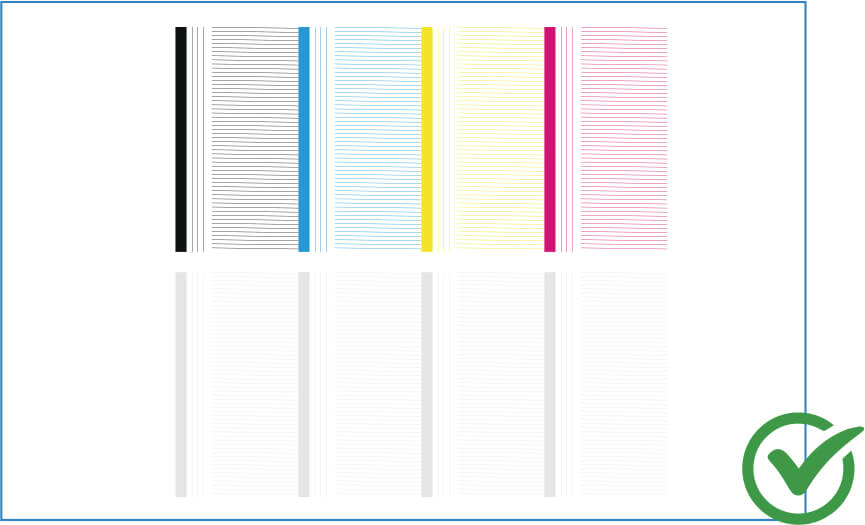
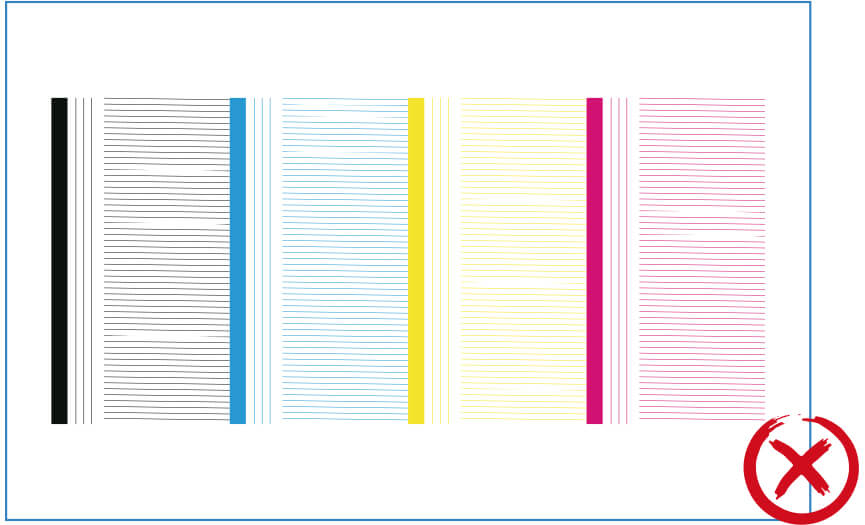
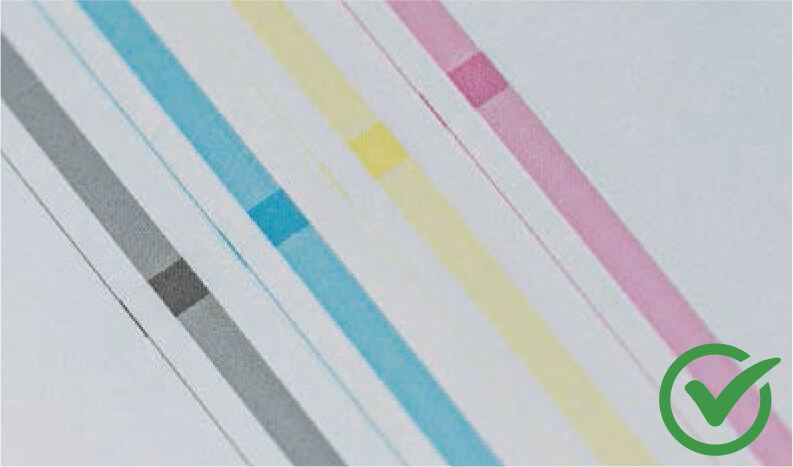
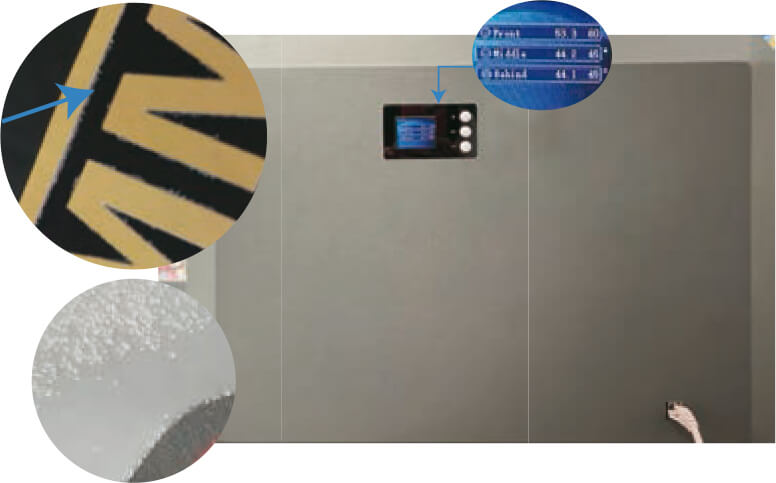
After switching on the printer, carry out a nozzle test. After printing the test pattern, check it carefully for missing or misaligned lines. Each line in the pattern corresponds to a specific nozzle on the printhead.
Solution: If all the lines are present and uniform, the nozzles are working properly. However, if the lines are missing or irregular, this indicates nozzle clogging or misalignment. Perform the cleaning procedure again until the nozzle test is correct.
Platform maintenance
Make sure that the print platform is clean. If there is any ink residue or dirt on the platform, wipe it off with a lint-free cloth soaked in alcohol.
Do not place any foreign objects on the print platform, as this may damage the print head during printing or moving.
Weekly maintenance
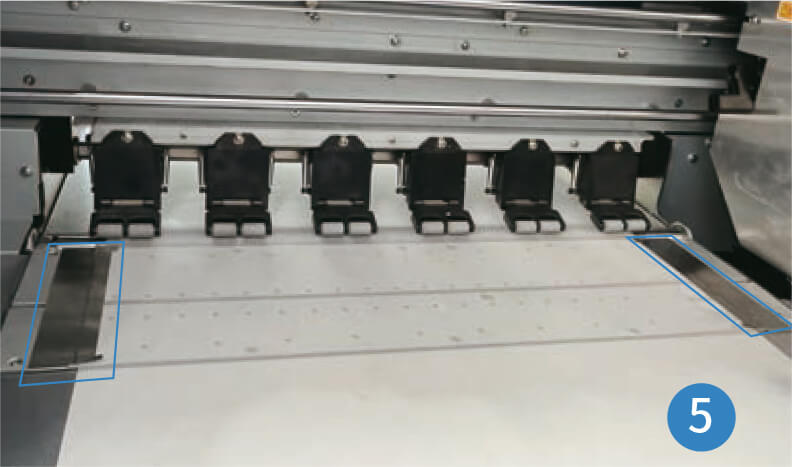
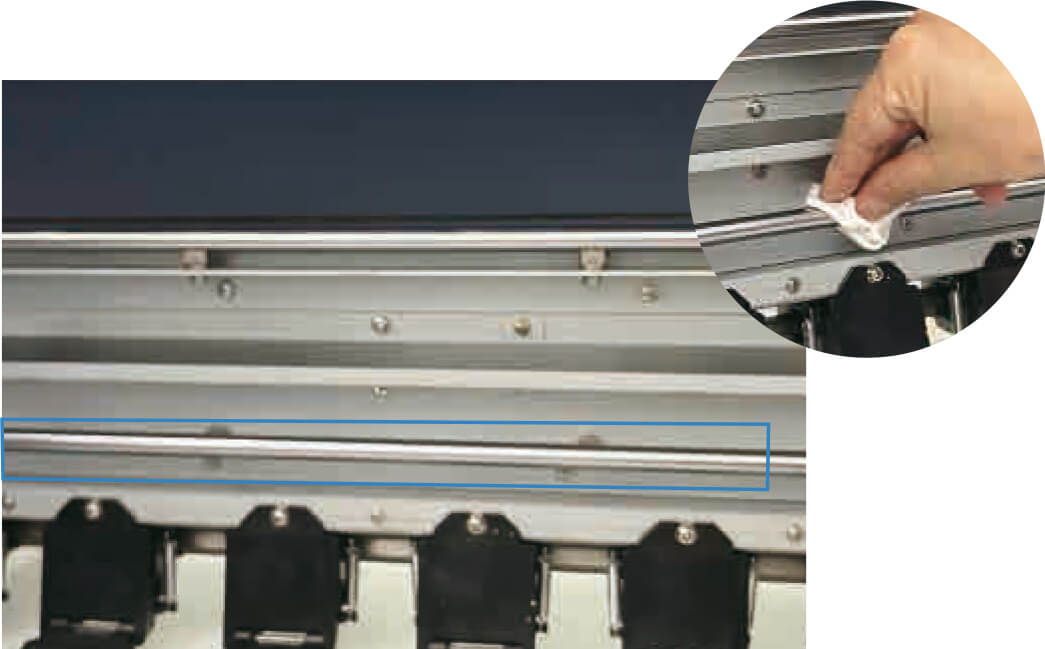
Cleaning the encoder belt
If the encoder bar is not cleaned regularly, the printer may not read the print area accurately, which can affect the print quality.
How to do it?
Wipe dirt and dust off the encoder strip with a lint-free cloth soaked in alcohol.
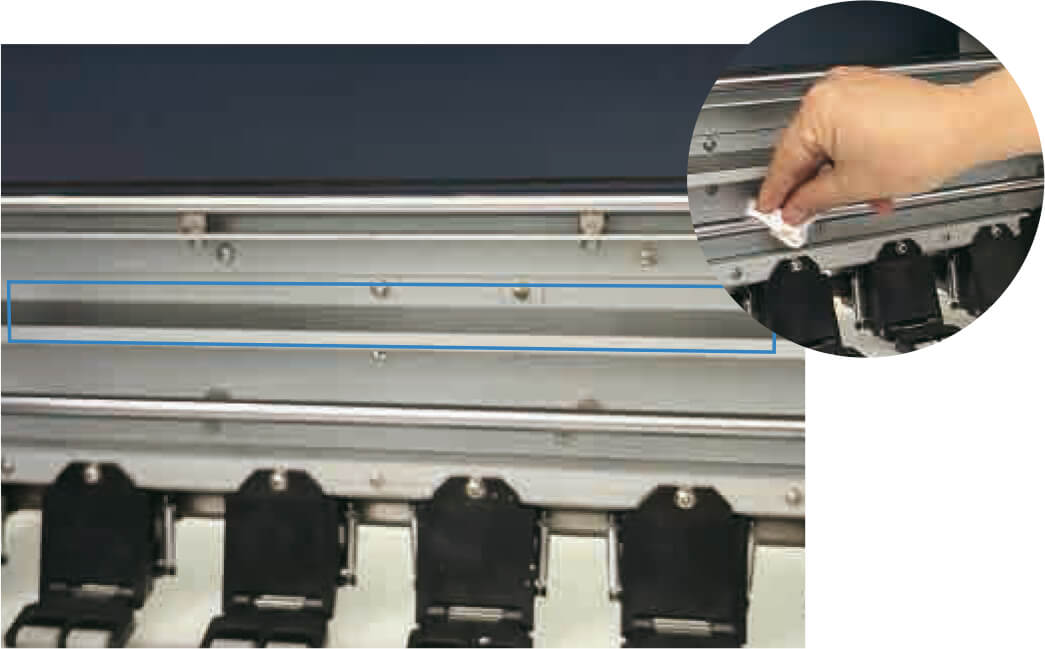
Cleaning the guide rail
Keeping the guide rails clean is essential for maintaining precise printhead movement, which directly affects print quality.
How to do it?
Wipe off dust or dirt with a lint-free cloth and regularly apply a small amount of grease to the guides.
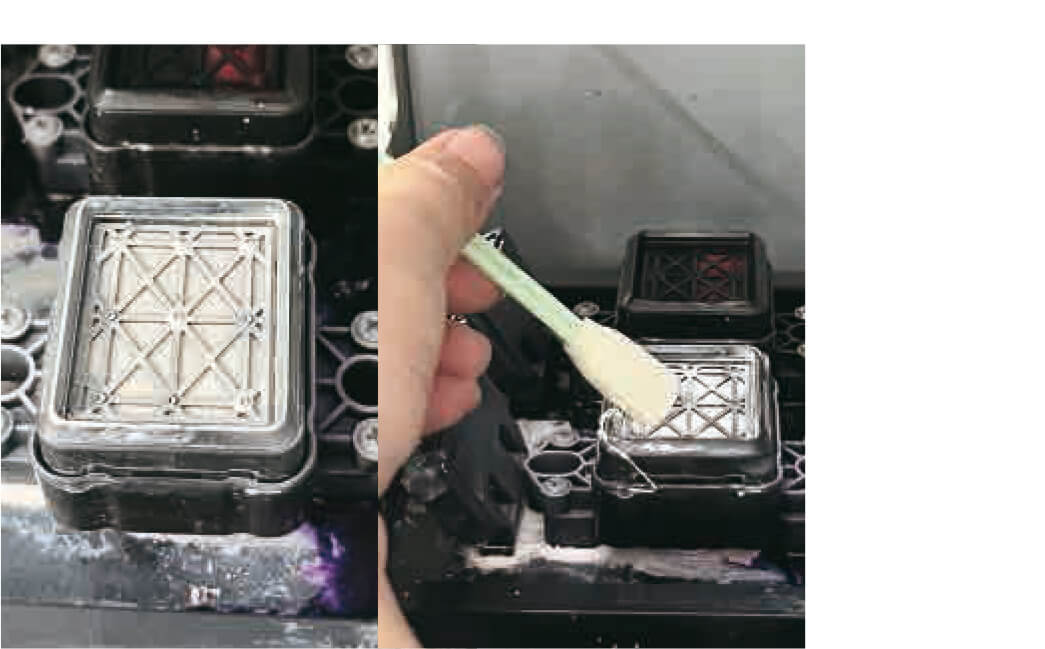
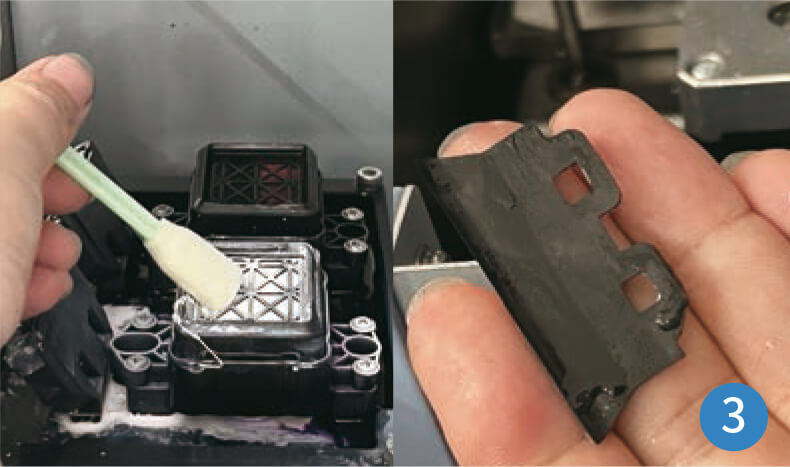
Cleaning the docking station
When the printer is not in use, the docking station closes the nozzle and keeps it moist to prevent the ink from solidifying, which can cause the nozzles to clog. The docking station must be cleaned regularly.
How to do it?
Turn the printer off, dampen a lint-free cloth or thumbtack with a suitable solution to wipe off excess ink from the edges. Allow to dry completely, then turn the printer on.
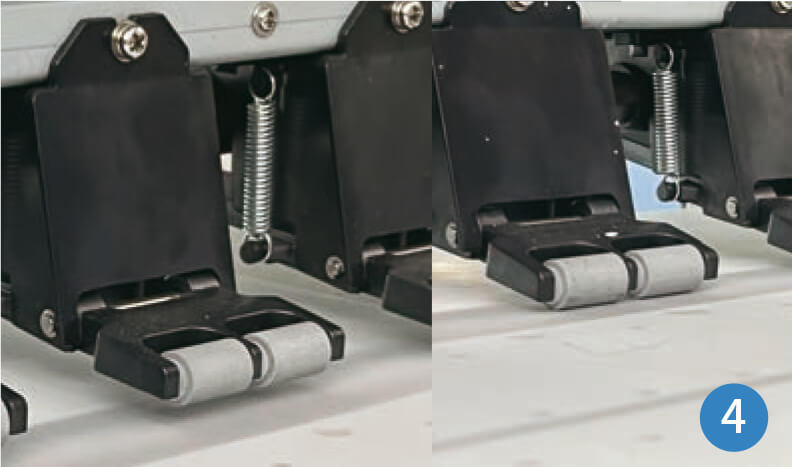
Wiper blade cleaning
The wiper blade is a component that removes excess ink or ink residue from the print head. It ensures a constant flow of ink and prevents streaking during the printing process.
How to do it?
Turn off the printer and, using a lint-free cloth moistened with a suitable solution, gently wipe the wiper blade.
Note:
- The DTF printer should be operated by trained personnel and supervised throughout its operation.
- When printing, keep an eye out for ink and film shortages. If the ink level is low, the printer will signal the need for a refill.
- Constantly monitor the flatness of the film and the condition of the print head to prevent print head scratches caused by jammed film.
- We recommend using the printer daily. If there are no orders, we recommend printing a test area every day to prevent the print head from drying up. Two days /e.g. a weekend/ without printing will also maintain optimum printing levels.
REMEMBER
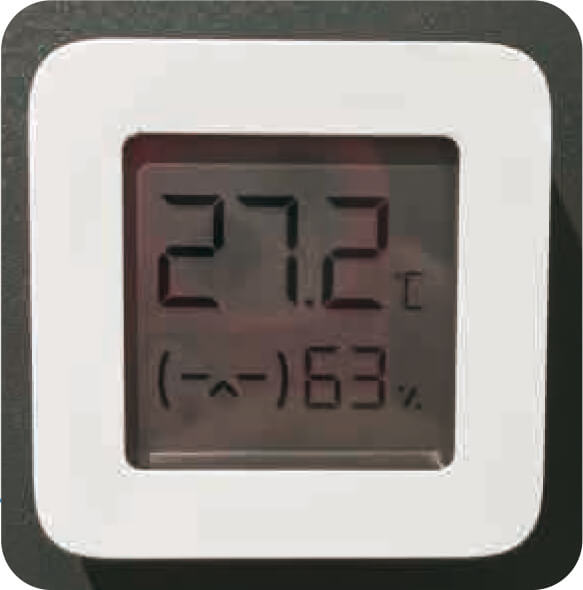
To maintain optimum printer performance and print quality, the effects of humidity and temperature must be taken into account.
The temperature in the room should be 25-28°C, and humidity levels 50-60%.
Place a temperature and humidity meter near the printer to closely monitor the printer's operating conditions.
Troubleshooting Guide - Software
Before starting the Otter DTF printer, these two programmes must be downloaded.
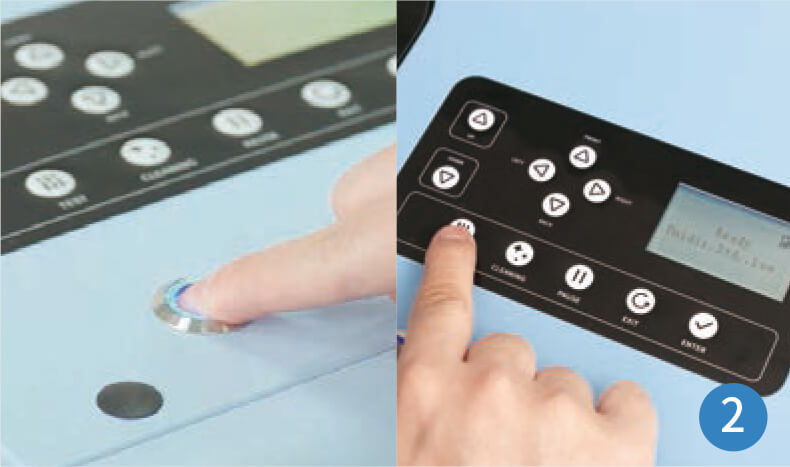
1. Otter DTF Printer Mainboard Control Software - Otter DTF printer control board software - Otter DTF printer control (cleaning, maintenance and calibration.
2. Otter RIP Software - for image processing and colour management.
1. What to do when the software suddenly crashes?
If you find yourself in this situation, please contact our after-sales team and we will ensure that your software is updated.
2. What should I do if the printer does not respond to software operations?
Check for sudden power failures or disconnections of the mains cable.
If the control software does not connect to the computer, try restarting the printer and the software.
3. What if the Otter RIP software does not connect to the printer when sending print data?
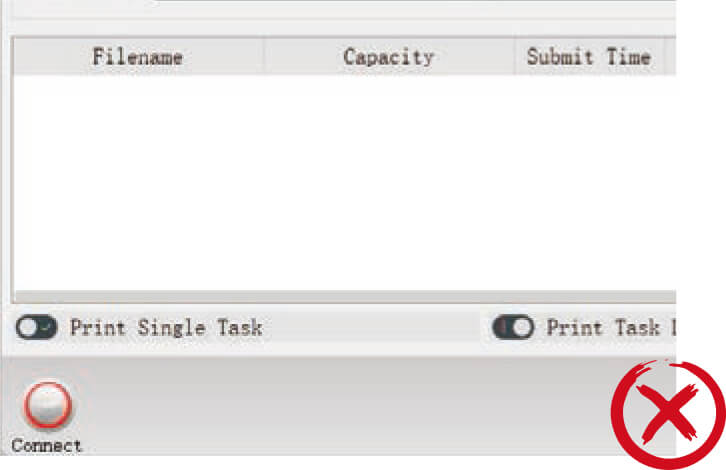
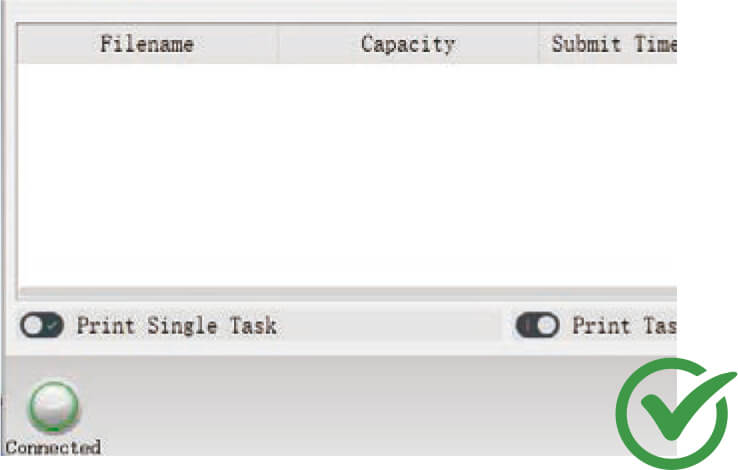
Solution 1
Check the IP address of the computer and that it is set to automatically obtain. Then set the Otter DTF printer as the default printer.
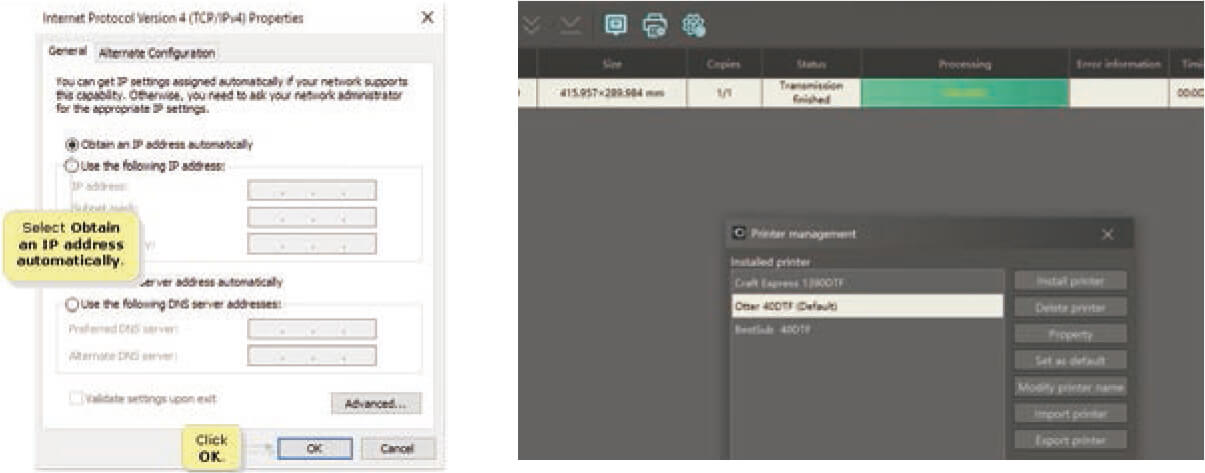
Solution 2
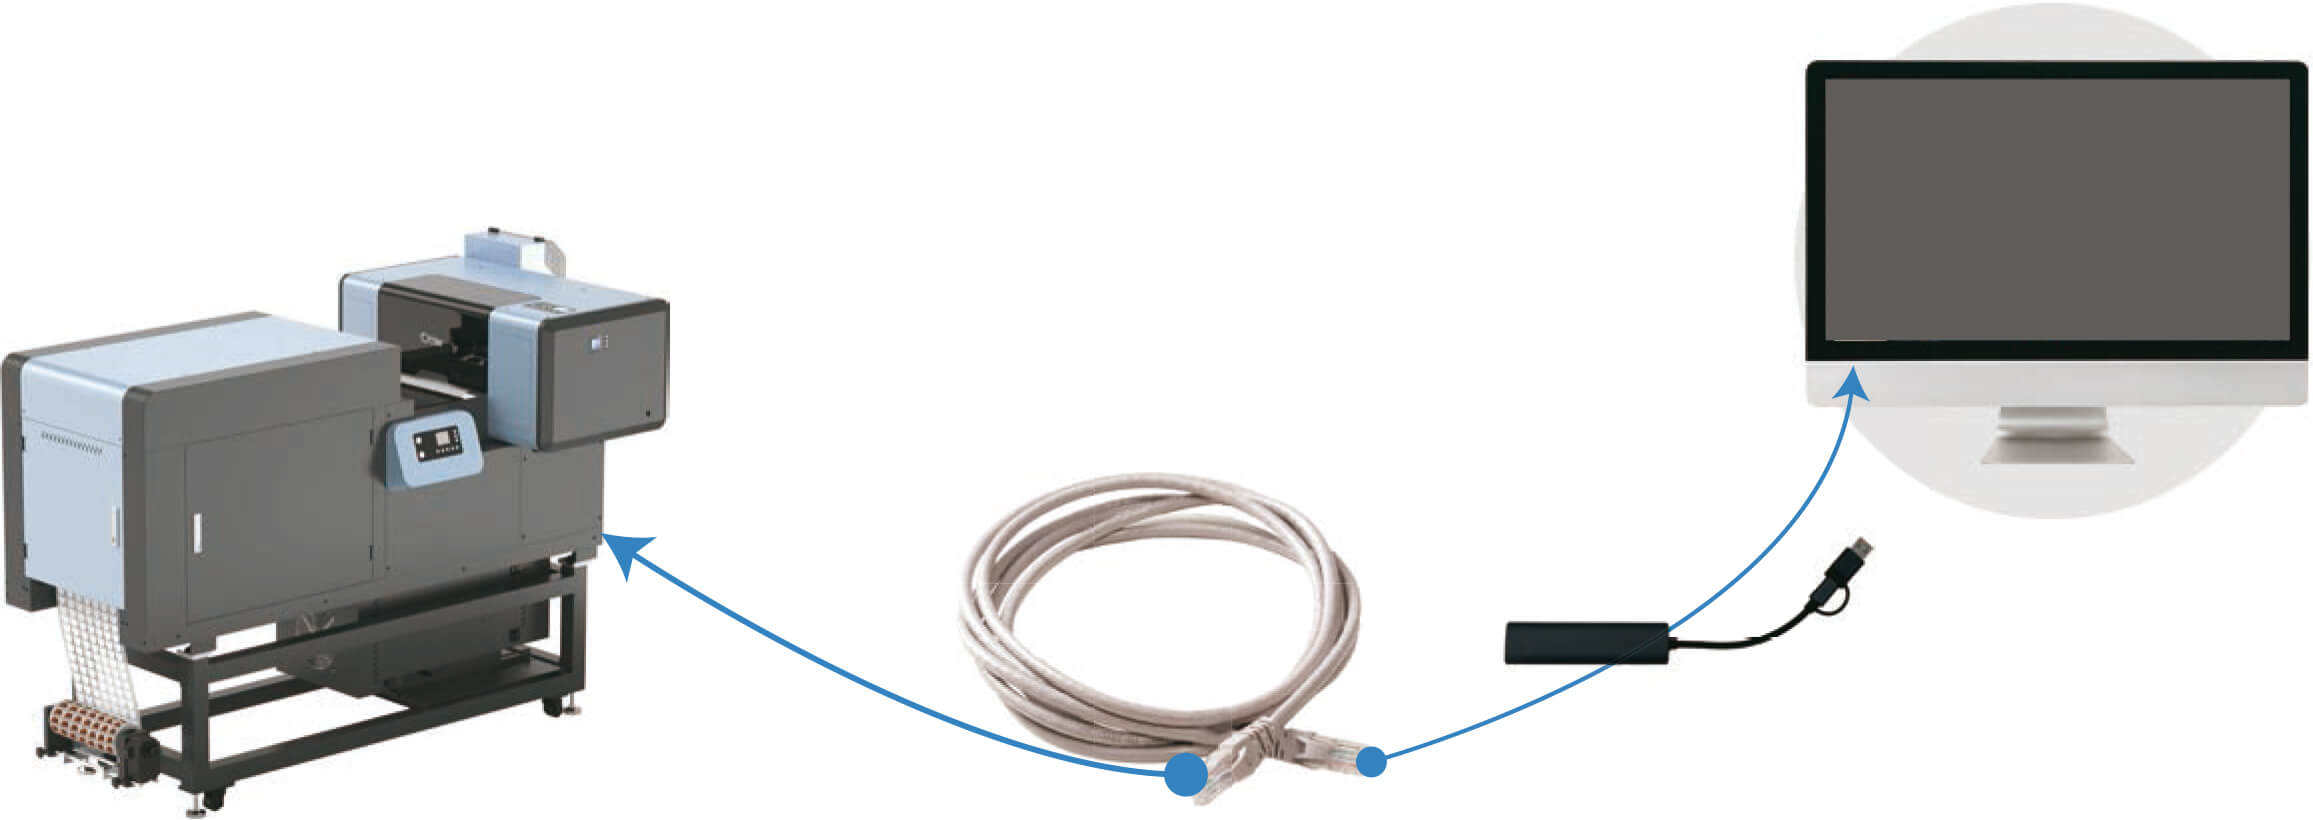
Make sure you use a Gigabit Ethernet cable (included in the spares kit) to connect to the computer.
If your computer is not equipped with a Gigabit Ethernet port, use a Gigabit Ethernet adapter.
Troubleshooting guide - Typical problems with DTF printouts
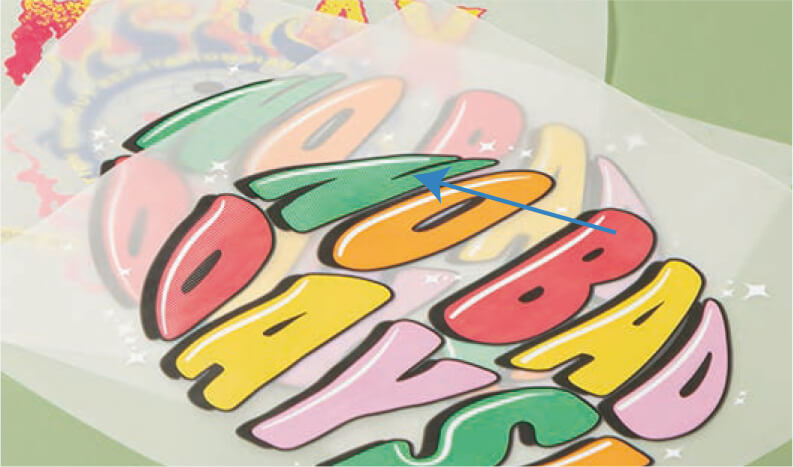
1. How do I remove the white outline?
Check that the white line comes from the project.
If so, adjust the design in the software
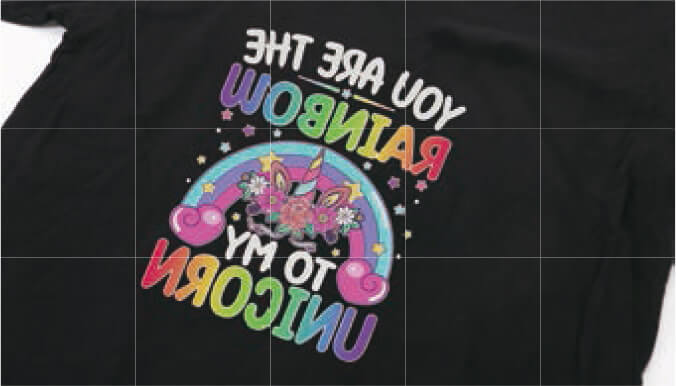
Open the software (Otter DTF Mainboard Control Software) and perform the printhead calibration indicated by the red box.
When finished, test again. If the problem persists, proceed to the next step.
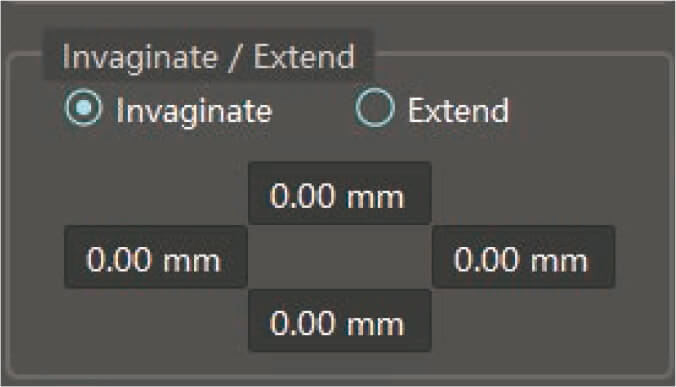
Open the software (Otter RIP Software) and click W1 and W2 on the right hand side, then select 'Invaginate' and adjust the settings in the four boxes or on the side where the white line is, making sure it is between 0.1-0.2mm.
2. Why does DTF powder stick to the unprinted area of the film?
Adjust the temperature settings on the DTF printers. We suggest setting the temperature parameters to 60-45-45°C for optimum results. This will help to eliminate excess moisture from the film.
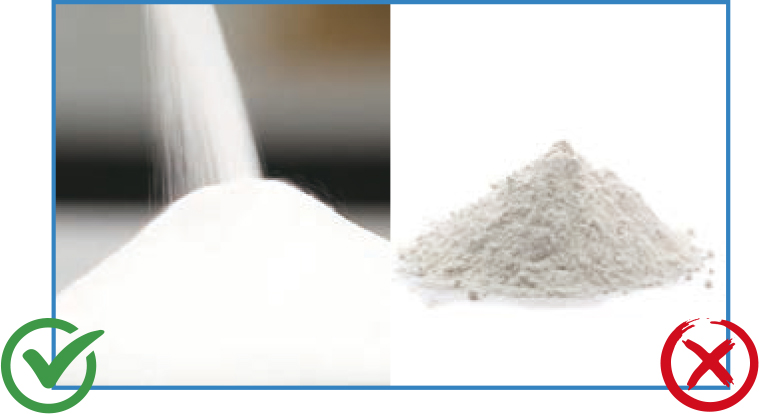
Check the quality of the DTF powder and replace it if it becomes caked or damp.
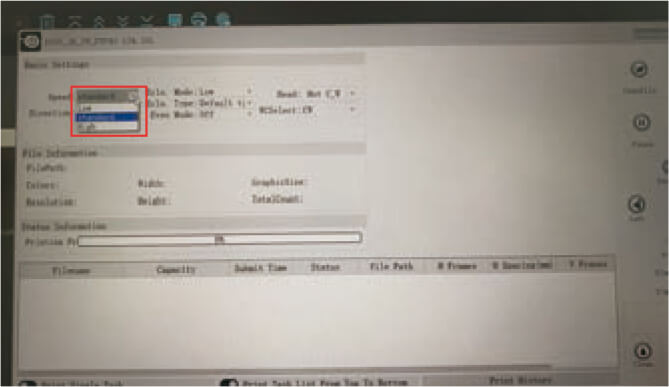
In the Otter DTF Mainboard Control Software, set the printer's print speed to standard. This will ensure even heating of the film during printing, facilitate even distribution of the powder and ensure a constant speed when entering the baking tunnel.
3. How do you prevent oil from coming back on the DTF film?


- Adjust the temperature setting on the printer's heating system to 60-45-45°C.
- Control the curing temperature. We suggest setting the temperature to 150°C for the dryer to allow the powder to dissolve completely. If you are using an Otter all-in-one DTF printer, no adjustments are required.
- DTF film must be stored properly. Use the printed film immediately to prevent oil from returning due to improper storage. For storage, use an airtight container and store it in a cool, dry place away from direct sunlight. Try not to store the printed film for too long. It is best to use it within 2-3 days.
- If oil returns, dry the vial for 2-3 minutes.
4. How to prevent printheads from clogging?
Use high quality DTF ink. We recommend using OtterPro DTF ink, it is compatible with the Otter DTF printer.
Clean the printheads regularly to maintain optimum performance.
It is recommended to clean the printheads at least once a week.
Always test the printheads before each print job. If the printing results are not optimal, immediate cleaning is necessary.
Clean the docking station and wiper blade regularly. It is recommended that this is done weekly to ensure smooth operation.
5. How to avoid white spots on the printed film?
- Use high quality ink and ensure that the water content of the ink is within normal limits.
- Make sure the water has completely evaporated and the printed film is fully cured to avoid incomplete drying resulting in white spots.
6. When should the printhead be replaced?
Printheads generally have a limited life depending on how often the printer is used. For the average user, heads last about 7-8 months.
If you regularly clean and calibrate the printhead, but still notice a drop in print quality, it may be necessary to replace it.
Mechanical damage, such as scratches, is another sign that the print head may need replacing.
7. How do I adjust the white ink ratio for different designs?
For bright designs, if the aim is to save white ink, we recommend setting the white ink ratio to 50%.
For dark patterns, setting it to 90-100% will give the best pattern effect.


8. How do I prevent the edges of the printed pattern from warping after the transfer?
- Choose the right fabrics. Softer fabrics may cause deformation of the pattern.
- Apply the correct temperature and pressure to distribute heat evenly over the printed pattern, preventing warping of the edges.
- Ensure that the fusible powder remains unaffected by moisture.
9. How do I solve the DTF printer's problem with no white ink printing?
Check that the ink damper shows separation.
Try loosening the cap of each ink bottle slightly, clean the print head and check the nozzle before printing to ensure the test lines are complete.
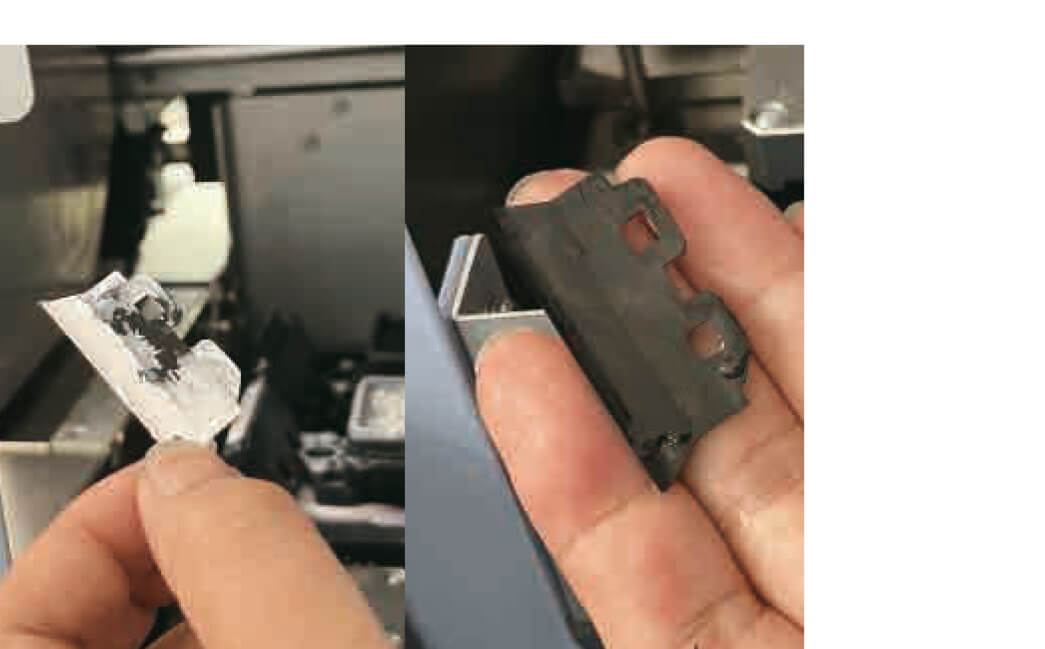
10. What if the printer's carriage hits the left end and stops moving?
- Make sure there are no obstacles blocking the movement of the trolley along its track.
- Wipe dirt and dust off the encoder strip with a lint-free cloth soaked in alcohol.
- Apply a small amount of grease to the trolley rail to ensure smooth movement.
11. What do I do if printing is suddenly interrupted?
If dropping stops abruptly without any error messages and the printheads return to their initial position, the following steps should be taken to resolve the problem:
- Check that the USB connection is not loose or disconnected.
- Check that the computer is responding. If not, restart it.
- Check that your computer's C drive is full, as this can affect printing.
- Try printing from another computer to see if the problem persists.
- Make sure that the voltage supply to the printer is stable. Voltage fluctuations can cause interruptions.
The above steps can help to diagnose and resolve sudden interruptions in the printing process.
12. What if there are colour differences in the printed patterns?
- First carry out a printhead test. This will help to identify any colour defects in your printouts.
- If the colour on the test strip is incorrect, clean the nozzles.
After cleaning, test the nozzles again to ensure that each colour is correct.
Note: It is important to perform a printhead test before printing any designs. This ensures that the printheads are in optimum condition, which will help prevent colour discrepancies in the printed patterns.
If a shadow is visible on the printed patterns, clean the encoder strip with a lint-free cloth soaked in alcohol.
13. What should I do if, despite cleaning the print head, the colour is not visible?
Typically, this problem is due to excess used ink on the cover and wiper blade, which can lead to clogging of the head nozzle.
Note: Regular cleaning of the wiper cover and wiper blade is essential to keep the print flowing.